


Adventure Begins in the Kitchen
Purchasing a mandolin slicer and making zucchini lasagna are two things that have been on my list for an unbelievable length of time. And I’d like to say that I purchased a mandolin slicer this weekend which allowed me to finally whip up zucchini lasagna, but that’s totally not the case. In reality, I bought the slicer about five months ago and it took five months to remember to put these five ingredients on my grocery list. I used to be much better at lists…
My intention for this recipe was something extra simple that involved lots of fresh stuff and minimal packaged stuff. Oh! And to make something that sorta kinda resembled lasagna. My intention was not slicing off the top of my middle finger, which most definitely happened.
FoodFash Zucchini Lasagna (Yields 4 servings)
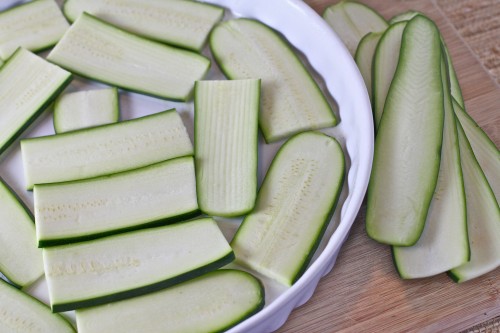
3 large zucchini, sliced lengthwise on a mandolin slicer
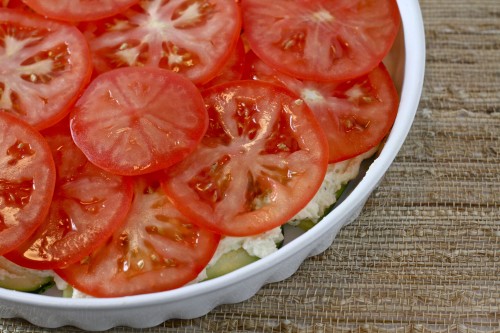
3 large tomatoes, sliced
15 ounces part skim ricotta
1 cup shredded mozzarella cheese
1/3 cup fresh, chopped basil
1-1/2 teaspoons garlic salt
1/2 teaspoon pepper
1 egg, beaten
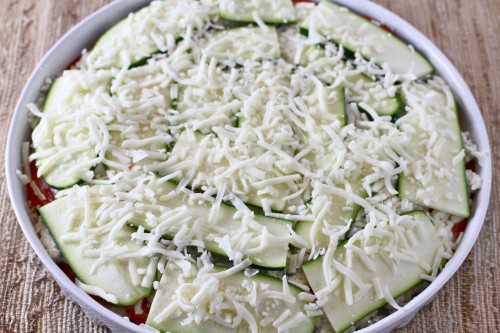
3/4 cup shredded mozzarella cheese
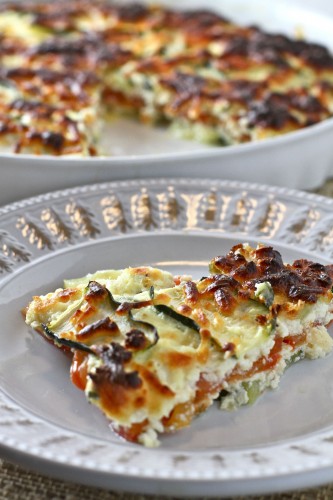
Preheat the oven to 425 degrees. In a medium bowl, mix ricotta, 1 cup mozzarella, and basil. Add the garlic salt and pepper, to taste if you prefer. Once the seasoning is added, mix in the beaten egg. In an 11-ish-inch round pan (I used this one), layer the bottom of the pan with sliced zucchini. Gently spread 1/2 of the ricotta mixture over the zucchini and then top with 2 layers of sliced tomatoes. Spread the remaining ricotta over the tomatoes and then top with a final layer of sliced zucchini. Sprinkle with the remaining 3/4 cup of mozzarella cheese. Bake for 40 to 50 minutes, until cheese is golden brown. Let cool for about 15 minutes (until liquid sets) before serving.
I was a little nervous when I pulled the super bubbly pan out of the oven, but once the cheese cooled everything held together quite nicely. And as far as the taste, I couldn’t believe how much this dish satisfied my lasagna craving. I’ve been eating the leftovers this entire week and my only complaint is that it only made four servings!

After flipping through the pages of a multitude of cookbooks for cakes to send out for Ariel, Val, and my gramma’s birthdays, I spotted a poppyseed angel food cake. Angel food cake? Everyone loves angel food cake! I hoped that this recipe would be enough for three mini loaves as I got to carefully cracking the eggs.

I used the angel food cake recipe from In The Sweet Kitchen, which called for 1-1/2 cups egg whites (about 10 to 12 eggs). Other than making a big ol’ pot of scrambled eggs for a group, I had never cracked this many eggs for a recipe. I certainly had never separated this many whites from yolks. Tedious, I tell ya!
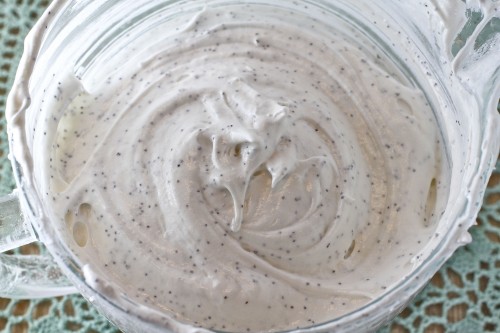
I frothed and fluffed an entire mixer bowl of egg whites and anxiously awaited stiff peaks. And then it was time for the second best part of this recipe, folding in the sugar and cake flour with my hands. There’s something so therapeutic about hands-in-batter, hands-in-dough, hands-in-meatloaf, hands-in-anything.

And then the first best part of this recipe came into play – it made enough for three mini loaves and one regular sized loaf for yours truly. I sampled some of the extra loaf and was so happy with how delicious the cake turned out. I seriously want to make angel food cake all day errr-day. This cake (without poppyseeds) and this frosting, everyday. Yum!!
I carefully wrapped each loaf in plastic wrap and packed tightly with some paper stuffing. I filled out cards with happy notes and sealed everything up. And when I dropped each package down the mail chute, I closed my eyes for a moment, wishing I could be present for these birthdays and birthday hugs. And when my eyes opened, I felt happiness in knowing that these packages will undoubtably relay that feeling.
Happy 30th, 29th, and 71st birthdays! I love you and miss you tons!